Showing posts with label recipes. Show all posts

Granola Bars! :-)

>> Wednesday, July 14, 2010

Well, I believe the verdict is in. Although the previous recipe was a bit sweet for my tastes, it does seem to be the one I will go with. When I tried cutting back on the honey the bars were very crumbly. So I guess I'm ready to post the recipe. :-)

A couple of weeks ago I ran across a wonderful find that I included in the bars... mini marshmallows. And not just any mini marshmallows... these were truly miniature! They remind me of the kind you get in packets of hot cocoa mix. I included them in the last batch of granola bars, and although I really liked them, the kids said they couldn't really taste the marshmallows. I suppose that's true... but I really like marshmallows. I'd be happy eating a bowl of these for breakfast. :-) In any case, I probably won't use these too often because the store that sells them is pretty far away. I will include them in this recipe, but if you want to either omit them or use something else (nuts or dried fruit) that would be delicious, as well.


And now, for the recipe! Here is the cast of ingredients. It's all pretty basic, and mostly what I use for our regular granola. And as you can see we go through a lot of oats! :-)

  • 3 cups oats
  • 1/4 cup plus 1 Tablespoon olive oil
  • 1/4 cup plus 3 Tablespoons honey
  • 1 heaping teaspoon cinnamon
  • 1/2 teaspoon vanilla
  • 12 teaspoons mini marshmallows
  • 6 teaspoons mini chocolate chips

This starts out the same as the other granola. Mix oats and cinnamon in a mixing bowl. Add 1/4 cup olive oil, 1/4 cup honey, and vanilla, and mix well. Pour into a non-stick baking pan and bake at 300 for 30 minutes, stirring every 10 minutes. If you stop at this point you can store in an air tight container and have very simple granola.

To make the bars, let the mixture cool for a few minutes, then pour back into the mixing bowl. While it's cooling, lightly grease a muffin pan.

Measure out 1/4 cup of the granola into a small bowl, and add 1 teaspoon of mini marshmallows, and 1/2 teaspoon mini chocolate chips. Mix well and pour it into a muffin cup.


Repeat this with the remaining granola. You'll probably have a bit of granola left over when all the muffin cups are full, so just put a little extra in each of the muffin cups.


When all the muffin cups are full, firmly pack the granola down into the cups. I've found using a plastic 1/2 cup measuring cup works well for this. I just place the measuring cup on the top of the granola, and press down with as much preasure as I can. When all the granola is packed down, bake at 300 for a final 10 minutes, then allow to completely cool. I usually let mine cool around 3 hours.


When the bars are completely cool, carefully remove them from the
muffin cups. I've found an easy way of doing this is to carefully slide a plastic knife down along the side of the bars. This applies just the right amount of pressure to free the bar from the pan. When I first took mine out of the pan they were very sticky. Almost too sticky. So I put them all on a cooling rack on top of a cookie sheet and left them in the (cool) oven overnight. This allowed the air to circulate around the bars and really helped with the stickiness.
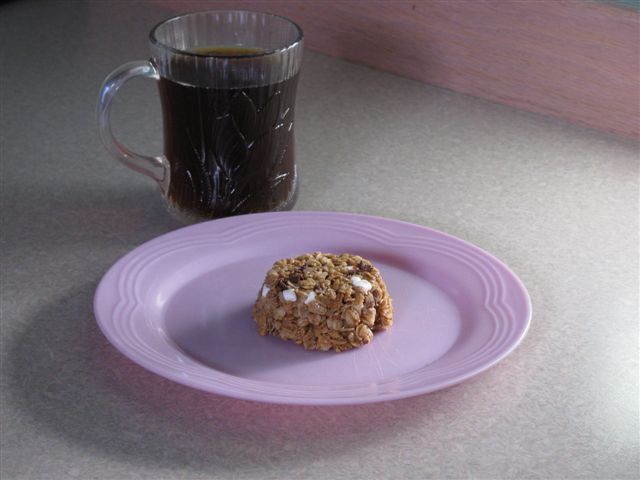
My family loves these granola bars! And even though they are a bit on the sweet side for my tastes, I do admit they go great with coffee! :-) We all thought they taste very close to the S'mores granola bars you can buy in the grocery store. And although they do have more honey than I'd like, at least they don't have the high fructose corn syrup or preservatives of the store bought ones. I also like the fact that they are round, rather than rectangular. It makes them a bit unique. I also think it helps them hold their shape a bit better, as there are no corners to easily break off.

I store these in an air tight container, but they could also be individually wrapped in plastic wrap. I've also decided I need to get a second cupcake pan so I can make more than 12 at a time. Otherwise I'm making a new batch every 3 days. :-)


Read more...

Rice Crispy "Donuts"

>> Monday, July 12, 2010

This year for Father's Day my girls wanted to make Daddy breakfast in bed. The only trouble was, he was running the sound board at church, and had to be there at 7:00. Which meant they'd have to get up at 5:30 to serve him breakfast. We did a bit of brainstorming, trying to come up with something they could make the day ahead and serve him in bed. Daddy likes donuts, and he also likes rice crispy treats. So we made rice crispy donuts. :-) I mixed up a batch of rice crispy treats, then we formed them around little cups to make the donut shape. Some of them ended up looking a bit more like ant hills than donuts, but it's the thought that counts. :-)

Saturday night I set my oldest daughter's alarm for 5:30. When it went off she woke her little sister, they crept downstairs and got Daddy's donuts (hiding in the entertainment center where he wouldn't find them) and brought them to Daddy. He was quite surprised, but mostly surprised that his girls were able to crawl out of bed so early in the morning!

Read more...

Granola Revisited

>> Tuesday, December 15, 2009

My family loves our granola recipe. We usually eat it for breakfast every morning. Recently I decided to try to come up with a way to make it in the oven, so it wouldn't take so long. I really like the ease of making granola in the crock pot, but there are days I don't have several hours available to watch it. My husband and children all agree they prefer baked granola to crock pot granola, as it is crunchier and also has sweet clusters of granola that stick together. I like the fact that it bakes so quickly. Here's what I've come up with.

6 cups old fashioned oats
1 1/2 - 2 teaspoons cinnamon (we like extra cinnamon)

1/2 cup olive oil
1/2 cup honey
1 teaspoon vanilla

Preheat your oven to 300 degrees. Pour the oats and cinnamon i
nto a non-stick baking pan. Mix the cinnamon into the oats. Next, pour oil and honey into a 1-cup measuring cup, followed by the vanilla. (By pouring the olive oil in first, the honey slides right out of the cup, rather than clinging to the glass sides.) Pour this mixture into the pan and mix well. Bake for 30 minutes, stirring every 10 minutes. Be sure to stir the granola at the sides of the pan, so it doesn't burn.

Once the 30 minutes are up, I usually give it one last stir, turn off the oven, and put the granola back in the oven to cool overnight. It doesn't need to cool that long, but I find leaving it in the oven gives it a little extra baking time and helps it dry out so it's read
y to eat by morning. If you have a well insulated oven, I'd probably let the granola cool on the counter, but our oven is pretty old and cools off quickly.

One batch of granola usually lasts us about a week. We each eat 1/4 cup in milk for breakfast. Sometimes my kids like to eat it as a snack, as well. One fun way we've found is making "healthy donuts." I slice an apple into 3 rings, spread peanut butter over the tops like frosting, and let the kids top it off with granola "sprinkles." Granny Smiths are what we had on hand tonight, but it's even better with sweeter apples. The girls like to do this with bananas, as well.


Read more...

Picky Eater

>> Tuesday, November 3, 2009

My youngest daughter is a very picky eater. For a while she would eat nothing but bean burritos, bananas, and raspberry yogurt. At least those three are healthy choices. Her doctor said not to worry about it, eventually she'll get tired of the burritos and will try something else. I don't think that will happen. Ever. :-) The other day I was searching the internet, trying to find recipes for picky eaters. One blog I ran across suggested Mac & Cheese, as the author of that blog had never known a kid who didn't like Mac & Cheese. She has never met my 5-year old. She will not eat Mac & Cheese. Or PB&J. All the normal kid foods, she won't touch. Unless it's loaded with sugar. But I try to avoid too much sugar with the girls.

Tonight I tried something new, thinking I had finally found something healthy she would love. It was healthy, disguised as junk food. I made "healthy donuts." But she wasn't fooled. She knew right away these were not "real" donuts. On the other hand, my 8-year old, who is not very picky, loved them! First I cored and sliced two apples into rings. I sliced the rings thick, as I discovered when I made them too thin they broke. So each apple made 3-4 "donut" rings. Then I spread peanut butter on each of the rings, and generously sprinkled home made granola over the peanut butter "frosting" for the sprinkles. I thought they were wonderful! My 8-year old really enjoyed them. My 5-year old thought they tasted too much like apples. :-) So the search for healthy food she will eat continues.

There is one benefit to her pickiness. She's even picky when it comes to candy. Both girls got quite a bit of candy this past week; they each have a sandwich sized ziplock bag filled. That might not be a lot of candy to most people, but since I'm trying to keep it out of the house as much as possible, that's a lot for us. Anyway, thankfully her pickiness also falls into the candy category. So when she takes a bite of something and decides she doesn't like it, Mommy gets to eat it! Which only seems fair, seeing as how I didn't get any candy last week.

I admire Moms who can get their kids to eat anything. Last week when we were eating supper at the church before AWANA, one of the girls at our table didn't really like what was served, but she followed her Mom's instructions and ate it, anyway. She didn't eat all of it, but each time her Mom told her to take a bite, she did. And it wasn't a little lick either, which is what my daughter would do. I think I'm going to try to teach her to just eat what she is served, whether or not she likes it. I'm getting tired of fixing burritos. :-) If anyone who reads this blog has a suggestion, either on healthy foods to try, or creative ways to get her to eat what we serve, I'd love to hear them!

Read more...

Recipe for Fun

>> Monday, May 18, 2009

I've seen several recipes online for home made ice cream in a ziplock baggie, and I've always wanted to try it. Well, tonight I decided this would be as good of day as any! It's a great easy recipe to do with kids! You will need...

Ingredients:

  • 1/2 cup milk (we used 2%, but it might be even better with whole)
  • 1 Tbs. sugar
  • 1/4 tsp. vanilla
  • 2 Tbs. Sea Salt
  • 4 trays of ice cubes
Materials:
  • 1 quart sized ziplock bag
  • 2 gallon sized ziplock bags
  • broom and dustpan
  • 50's music
People:
  • Mommy
  • 2 giggly girls
Directions
  • Pour milk into the small ziplock baggie. I found it helpful to push the baggie down into a tall glass, with the edges of the baggie hanging over. It made it real easy to make the baggie stand up. I measured out the milk, and my 5-year old helped me add all the ingredients.
  • Let your 5-year old scoop one Tablespoon of sugar out of the sugar canister
  • Sweep one tablespoon of sugar off of the Mommy, the counter, and the floor
  • Help your 5-year old measure out one Tablespoon of sugar, and add it to the milk
  • Poor in 1/4 teaspoon vanilla, plus whatever extra splashes come with it
  • Seal up the baggie
  • Insert one gallon baggie into the other (This is extra protection in case all the shaking punctures a hole in your gallon baggie)
  • Fill the inside gallon baggie with all four trays of ice cubes
  • Insert the baggie with the milk mixture into the large baggie, burying it into the ice
  • Pour 2 Tbs. salt into the large baggie, and seal
  • Turn on the 50's music, and let the giggly girls take turns shaking up the bag!
We had such a blast with this! I didn't time to see how long we shook our bag, but we got a bit impatient for a sample so I'm sure it wasn't more than 10 minutes. It could have used a bit more shaking, but it turned out pretty good! We poured the ice cream into a small bowl, and each got a spoon and dug in. We'll make it again later this week when Daddy is home, and this time I think we'll make more than just one serving. 1/2 cup is just not enough to share between 3 or 4 people! :-) This would also be great with chocolate syrup!

Read more...

Sugar Cookies

>> Tuesday, February 10, 2009

I realize we're two months past Christmas, and I never posted my recipe for sugar cookies. So here I am, a couple months late! Which pretty much describes almost every aspect of my life. :-) (Actually, I would have posted these much sooner, but for some reason I wasn't able to access the folder on the computer with these pictures. My hubby finally figured it out for me today, so I could post the pictures.)

This recipe comes from a Sesame Street book my parents bought when I was in Preschool, and the recipe is called Cookie Monster's Sugar Cookies. I remember my Mom making these cookies as I was growing up, and I loved them! This year I made them for my family, and they were a hit! But as it turns out, I realized I don't follow the original recipe. I didn't mean to improvise, but apparently I did. So I'll post my modified recipe, since that's what I've been making.

1/2 c. butter

1 c. sugar
2 eggs
1 tsp. vanilla
2 & 1/2 c. flour
1 tsp. baking powder
1 tsp. salt


Blend butter and sugar with fork. Mix in eggs and vanilla. Sift flour, baking powder and salt, then add to the bowl. Knead (this is the kids' favorite part!), then chill at least one hour, or overnight. Roll out and cut into shapes on a floured board. Bake at 400, 6-8 minutes.

And here's the finished product. These are the nativity cookie cutters my parents gave us for Christmas. See if you can make out all the shapes...
I apologize the picture is a big blurry. I took this picture Christmas Eve, and I guess I didn't bother checking until now to see if the picture was in focus. :-) In any case, I'm sure you can recognize the heart, star, angel, camel, king, Joseph, Baby Jesus and manger, Mary, shepherd and sheep. But can you guess what that odd looking shape is under Mary? Actually, it's in the picture upside down. It's supposed to be a donkey, but when I first pulled the cookie cutter out of the container I couldn't figure out what that animal was supposed to be. I turned it upside down and thought it looked like a slug. My husband says this is the NorthWest version of the nativity, as we get a lot of slugs in our neck of the woods. :-) So for our family, the final critter, rather than being a donkey, is a slug.

Read more...

"It's smellin' really good in here!"

>> Monday, December 1, 2008

It just warmed my heart to hear those words from my almost 5 year old daughter this afternoon! I had some canned pumpkin left over from Thanksgiving, so today I decided to make a batch of chocolate chip pumpkin cookies. It's a good thing I only get into a baking mood around Christmas time or we'd all need to buy bigger pants! But there's just something about the lights of the Christmas tree and Christmas music playing over the radio that makes me want to bake. So here's one of our favorite cookie recipes.

Chocolate Chip Pumpkin Cookies

Cream together:
1 & 1/2 c. sugar
1/2 c. butter
1 egg

Sift:
2 & 1/2 c. flour
1 tsp. baking soda
1 tsp. cinnamon

Add alternately to sifted ingredients:
creamed mixture and 1 cup of canned pumpkin

Stir in:
1 tsp. vanilla
1 c. chocolate chips
1 cup chopped nuts, if desired (although I like the nuts, my kids don't so I leave these out)

Drop by teaspoons onto cookie sheet and bake at 325 13-17 minutes until firm, but not hard. Enjoy with a glass of cold milk!

Read more...

Crock Pot Granola

>> Thursday, November 20, 2008

Cooking is not one of my gifts. However, there are a few simple recipes I have come across that I enjoy making, and my family enjoys eating. With two picky children, sometimes finding things they will eat can be difficult. So when I found this recipe for home made granola, I was thrilled when both of my children loved it! And lately granola has become a staple in our home, especially considering we can easily go through a box of cereal per week. With all the preservatives and sugar, not to mention the price, we've decided store bought cereal will be an occasional treat, rather than a daily indulgence. In fact, I've got some cooking right now! So here's the recipe...

  • 6 cups Old Fashioned Oats
  • 1/2 cup olive oil
  • 1/2 cup honey
  • 1 tsp. cinnamon
  • 1 tsp. vanilla

In your crock pot, mix oats and cinnamon. Stir in olive oil, honey, and vanilla. With lid cracked, cook oats on low 3-5 hours, or until granola just begins to turn golden brown. Once the granola is finished I usually pour it out on a baking sheet to cool, then store in an air tight container. I'm not sure how long the granola stays fresh; it doesn't usually last too long in our home. The girls like it with milk for breakfast, or dry as a snack. I think the longest it has ever lasted is 5 or 6 days, but as oats can be bought pretty inexpensively in the bulk department of our grocery store, it's a pretty economical food.

Tips and Hints:
  • Be sure to keep the lid cracked during the entire time you are cooking your granola. I usually stick a silicon spatula in the crock pot, to prop the lid open.
  • Stir the granola every hour or so, to keep it from sticking to the bottom of the crock pot. If your crock pot has hot spots, stir more frequently. Usually some granola will stick to the bottom of the crock pot, but I let it soak for a couple hours with hot soapy water after I empty it, and then it's a snap to clean.
  • If you like dried fruit or nuts in your granola, mix them in for the last 30 minutes. Raisins and dried cranberry's go well.
Well it looks like it's family movie time, so I'd better shut down the computer. I'm looking forward to granola for breakfast tomorrow! :-)

Read more...

  © Blogger templates Artsy by Ourblogtemplates.com 2008

Back to TOP